

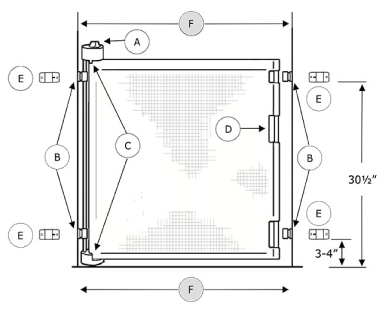
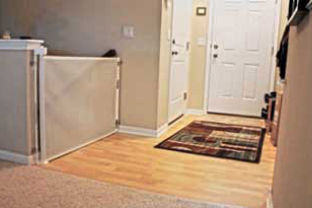
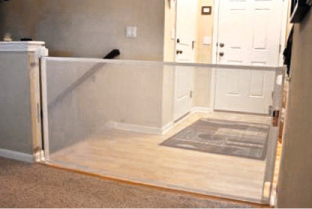
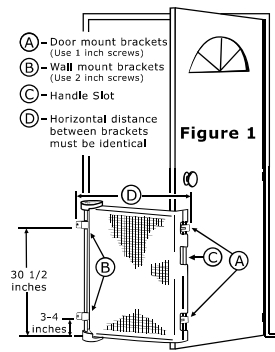
The Retract-A-Gate by Smart Retract can mount in the door jamb, around the side of a walkway on the wall, at an angle, or even at the top or bottom of the stairs. Install the top brackets first, about 30.5 inches off the floor. Mount the lower brackets next between 3-4 inches off the floor. Then simply snap the gate into the brackets and it's now ready to use. A major design feature of the Retract-A-Gate is its easy installation. Because of this, you can attach the gate to either side of an opening.
Specifications
Every installation is unique, so we offer several optional accessories to help you install your Smart Retract products. Read through the following installation types to determine which accessories you might need
When installing to a wall, there are a few accessories you may need depending on your installation area. With a wall installation, it is important that it is safe and secure and that the gate fits square in the-opening. Read more about these accessories here.
Wall Spacers are needed if the area in which you are installing the Retract-A-Gate or Bow Wow Barrier has a baseboard molding or if the opening is not square. Read More
Drywall Anchors are needed if you are installing the Retract-A-Gate or Bow Wow Barrier to drywall, and you are unable to locate a wall stud or only a single wall stud is present. Read More
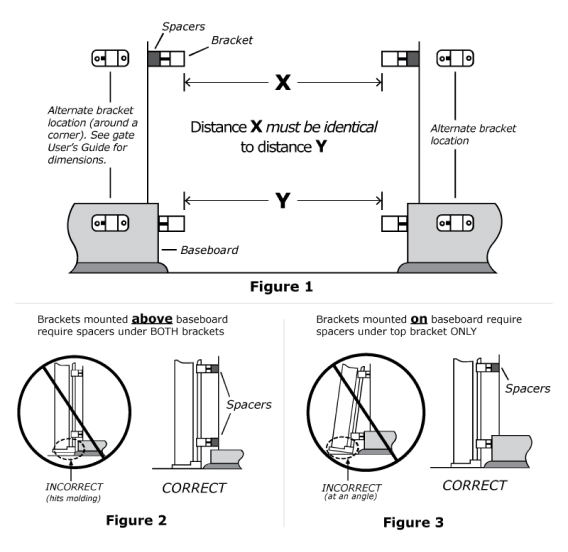
The Wall Spacers are installed in between the mounting brackets and the wall to push the mounting brackets out from the wall past the baseboards. This is because these products must be installed with an identical horizontal distance between all the brackets (X and Y in the diagram). The spacers also prevent the baseboard from interfering with the performance while opening or closing.
For taller baseboards (more than 4 inches tall) the bottom bracket will be installed on the baseboard. Therefore, the spacers will be installed in between the upper bracket and the wall to push the bracket out from the wall so it is flush with the bottom bracket. If the baseboard on both sides of the opening is less than 4 inches tall, you will need 2 sets of spacers. If the baseboard on both sides is 4 inches tall or more, you only need 1 set of spacers.
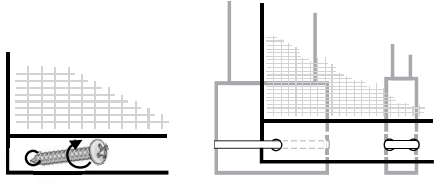
Note: The spacer thickness must match the thickness of the baseboard. Stack the spacers to create the needed width (to a maximum of 5 spacers).
You will need spacers the same thickness as the baseboard. We recommend having the screw attach into a minimum of 1 inch of solid wood, so you may need longer screws. To get the total screw length, add the spacer thickness + drywall thickness + 1 inch into the wood. Our screws are 2 inches long. If you need a longer screw, make sure you get the same exact kind (#6 flat head), but with a longer length.
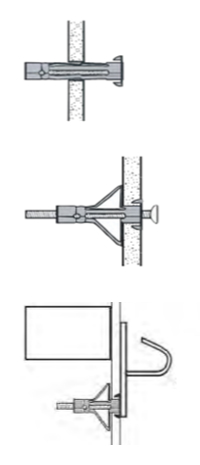
If you are installing your Retract-A-Gate or Bow Wow Barrier to drywall we recommend attaching the brackets to a double wall stud to provide the best holding power. For areas with only a single wall stud, or no wall stud behind it, we recommend using drywall anchors so the brackets are as secure as possible.
The screws for each bracket are spaced just over two inches apart (most wall studs are 1.5 inches wide). If installing at a corner or in a door frame, wall studs are typically doubled up giving you plenty of space to attach the brackets, so drywall anchors are not needed.
For areas with only a single wall stud, you need to use one Drywall Anchor for one screw on each bracket. If all the brackets will attach to drywall only with no wall studs; then four Drywall Anchor Kits would be the most you need. Please note that it is not recommended to attach brackets where no studs are present. Smart Retract’s anchors are specially designed for installation of these brackets on drywall thicknesses ranging from 3/8 to 5/8 inch.
When installing to a banister post, a flat surface 2.5 inches wide will be needed. If your post is rounded, too narrow, or you want to avoid screwing into your post/spindle, you will need a Stair Banister Adapter kit for your installation. The kit also works well for metal and wrought iron railings. Read more about the Stair Banister Adapter Kit:
A Stair Banister Adapter Kit may be needed if you want to attach your Retract-A-Gate to a stair post or spindle without drilling holes. Read More
If you decide to move or adjust your Stair Banister Adapter, the current straps will need to be cut and removed. Read More

The 36-inch adapter will work with most standard stair posts and the 48-inch adapter is for taller posts. Most posts have flat or rounded areas at the top and bottom and then are narrow in the middle. The adapter is designed to span over the narrow area to provide a level surface for the brackets. If the distance from the floor to the upper round or flat area of the post is more than 36 inches, you will need the 48-inch adapter. The adapter may be cut shorter if needed, but no less than 32 inches.
For the top of the stairs, we recommend mounting the safety gate a minimum of 6 inches back from the edge of the top step. Otherwise, Retract-A-Gate can also be installed at an angle to help achieve this distance. This allows the brackets to attach to one side of the stairs and then angle towards the other side. For the best security with an angled installation, the openings of the brackets should face away from the Retract-A-Gate.
For the bottom of the stairs, we recommend mounting the safety gate on the floor and not up on a step. If the safety gate was mounted up on a step, a child would have farther to fall if they stepped up and then fell backwards. Each kit comes with one adapter and hardware. If both sides of your Retract-A-Gate are going to be installed onto a post or spindle, you will need two Adapter Kits.
If you decide to move or adjust your Stair Banister Adapter, the current straps will need to be cut and removed. By purchasing the Additional Stair Banister Adapter Straps, you can move or adjust your adapter and still strap it to the post. When installing the Safe Railing Guard to posts that are too wide for the 17-inch straps, the Stair Banister Adapter Straps can be used.
Each Retract-A-Gate comes with one Universal Mounting Bracket Kit. If you want to move your gate to another place in your home, you can install additional mounting hardware in another location. The Retract-A-Gate easily pops out of the brackets and can be snapped into the brackets in the other location. That’s all there is to it! Look at the details of the Universal -Mounting Bracket Kit below.
Each Retract-A-Gate and Bow Wow Barrier comes with one Bracket Kit; the Additional Wall Bracket Kit is useful to install a gate in another location. Read More
Additional Wall Brackets make it a snap to move your Retract-A-Gate from one location to another. Retract-A-Gate easily unsnaps from the brackets and moves in seconds to the other area. Also, with the Retract-A-Gate and an Additional Bracket Kit, you can use one gate to pivot to cover two locations, as shown.
For each additional area you wish to install the gate, you will need one additional Universal Mounting Bracket Kit
Smart Retract does not make custom-sized gates, but we do have a few good options for covering wider spaces with multiple gates. If you would like to install a barrier in an opening wider than 72 inches (the width of our widest gate), our retractable safety gates can be connected. Explore more about the accessories that can connect the gates together.
S-Hooks are used to hook two Retract-A-Gates together to cover openings that are up to 104-144 inches. Read More
Gate Connector Straps are used to connect two or more gates together to cover wider openings. Read More
Some customers hook two Retract-A-Gates together using two S-hooks to cover openings that are as wide as 104 to 144 inches. Each safety gate mounts to either side of the opening, then the handle rods hook together in the middle with the S-hooks – one in the top cutout, and the other in the bottom cutout. This solution is only for low traffic areas and non-critical applications, or where only a visual barrier is needed. Retract-A-Gate is very easy to operate with one hand; however, when using two gates you need two hands. The double gate option has not been tested or certified for use with children. It is just an option for non-critical applications.
Each pair of gates that you decide to mount using the S-hooks will need one set of S-hooks. This is a total of one set for two gates.
For situations where you would need a taller gate, the Retract-A-Gate can be mounted one above another to cover more vertical space. Check out the Mounting Clip Set that allows one gate to be installed above another.
Mounting Clips are used to mount one gate above another to create a barrier that is taller than 34 inches. Read More
Some customers mount one gate above another to create a barrier that is taller than 34 inches. Retract-A-Gate is one of the tallest gates on the market; however, some pets are very athletic and can jump very high. Mounting one gate above another helps to prevent them from getting over the gate. The way it works is to use these special clips to suspend the second gate above the first. This use is for pets only.
To mount one gate above another, you would need one Clip Set.
Smart Retract’s Bow Wow Barrier is for use on exterior doors. It is mounted to the door so when the door is opened, the Bow Wow Barrier extends to block the opening and pets cannot go through. Install the top brackets first, about 30½ inches off the floor. Mount the lower brackets next, between 3-4 inches off the floor. Then simply snap the barrier into the brackets. It's now ready to use!
Specifications
At Smart Retract, we understand that every installation is unique. We offer several optional accessories to help you install your Smart Retract products. Read through the installation types below to determine which accessories you might need.
When installing to a wall, there are a few accessories you may need depending on your installation area. With wall installations, it is important that the connection is safe and secure and that the gate sets squarely in the opening. Read more about these accessories below:
Wall Spacers are used with brackets to keep the spacing across the opening identical, or to prevent the baseboard from interfering with the gate operation.
Drywall Anchor Kits are used to mount brackets over drywall
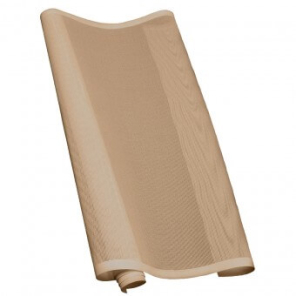
The Safe Railing Guard attaches to your balcony or deck railings to help prevent children and/or pets from getting through the spindles. First make a hole in the bottom hem on the left or right corner at least 1/2 inch away from the edge. Then secure the mesh to your post or spindle with one of the included straps at the lowest height along the bottom and repeat this process for the top. Once the side is secured, repeat the process every 12-18 inches until the area is covered.
Specifications
Every installation is unique, so Smart Retract offers optional accessories to help you install your Safe Railing Guard. Read through the information below to determine if you need additional accessories.
When installing the Safe Railing Guard to a banister post or spindles, you will need a strap for both the top and the bottom of the railing guard to attach it to the railing. Straps come with the Safe Railing Guard product, however, if decide to move or adjust your railing guard, you will need additional straps. Read more about Additional Safe Railing Guard Straps.
If you decide to move or adjust the Safe Railing Guard, you will need to cut and remove the existing straps. Purchase additional straps as needed to move or re-install the mesh.
The Safe Railing Guard Straps should not be used for the Stair Banister Adapter Kit.